


As an apprentice woodworker I first learned the use of machines to do rectilinear work quickly and efficiently. But I also found that rectilinear work was, well, boring to my taste, and I began to think about curves. Two of the most attractive curve forms I’ve found on furniture are the cabriole leg and the oval, or ellipse. Both of these curve forms spark the interest of the eye because the arcs of their curves are constantly changing through their shapes, unlike a circle which, by definition, has a regular radius.

Though you can use machines to help make these shapes, using hand tools to create and smooth the final form is still one of the most efficient ways to do it. You can use a stationary sander to shape the legs. But a spokeshave has the advantage that it tends to create a smooth line, like a handplane. Moving sandpaper cuts wherever you apply it, and can easily make depressions right where you don’t want them. A spokeshave will tend to pass over gullies and cut high spots, thus making the contour regular.
Spokeshaves, drawknives and scrapers are the more skilled approach to this kind of work. But they don’t require years of experience to learn how to use. They must, repeat must, be sharp, (see article on sharpening) but once you pass that simple hurdle they present a problem only on end grain. And, by following a progression of simple steps, it is not difficult to achieve beautiful, flowing lines. It is, however, time consuming to do this work. But what a pleasurable way to pass the time- no irritating dust to breath, or noisy machines to rattle your nerves; just you, a sharp iron, and wood.
DESIGN

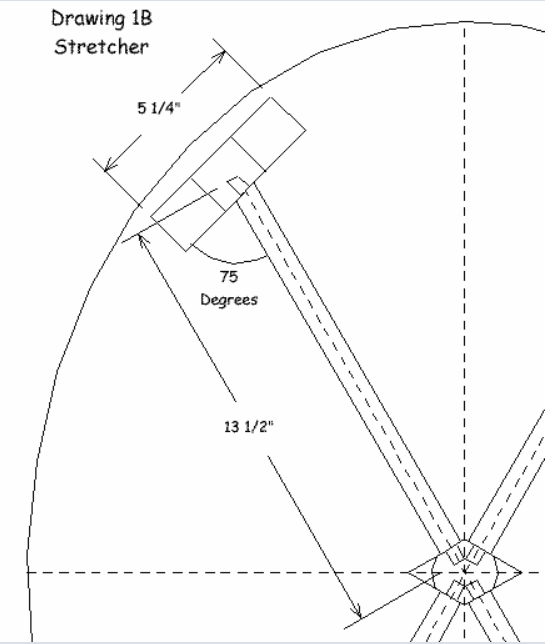
The oval table top causes a complication with the stretcher rails that join the legs underneath. The stretchers must join the legs at an angle, rather than at 90o to the rear face of the legs. You could orient the legs so that the rear faces point toward the center, but if you did so the front face of the legs would not be parallel to the edge of the oval top where the legs join the top. This would look very odd. The solution is to cut angled tenons on the stretchers that fit into right-angled mortises on the legs. Study drawing #1 to understand how the parts are aligned.
 Parts List- Side Table (inches) 4- 1-3/4 x 4 x 33 -legs
8- 1-3/4 x 4 x 12 -knee blocks
4- 3/4 x 3-1/4 x 13-1/2 -stretchers
4- 1-1/2 x 2 x 10 -rails
1- 1/2 x 29 x 37 -top
Resources for building an oval side table
- Drill Presses
- Drill Bits
- Measuring and Layout Tools
- Chisels
- Clamps
- Band Saws
- Spoke-shaves
- Draw-knives
- Scrapers at Woodcraft
- Table Saws
- Lathes and Turning Tools
- Dado Sets
- Hand Saws
- Hand Drill
LEGS
Let’s start with the legs since they are the bulk of the job. Get out the four legs at 1-3/4 x 4 x 33-1/2 inches. The thickness is not critical, and you can use surfaced 2x lumber just as it comes from the hardwood store, but be sure the parts are fairly straight so you won’t have problems gluing on the knee blocks. Make a paper template using the scale drawing given (drawing #2). Once you have sketched in the lines on paper for your template, check to see that the lines flow smoothly by sighting down your drawing with your eye close to the plane of the paper. That is, line your eye with the line of the drawing, or a section thereof. From this angle you can see easily how smooth the line is. Duplicating the drawing exactly is not as important as making smooth lines. Also be sure the leg tapers consistently.
Cut out your template and trace it onto one side of each leg blank. The leg blanks are 1/2″ longer than the template, to give a horn on the top. The horn is an extension left on the end of a piece that will be mortised. Its purpose is to prevent the end from splitting while you hammer a chisel into the mortise while cutting its walls. Once the mortise is complete, cut the horn off. Locate the template with the horn at the top, since that is where the leg-rail mortise will be. Also- note the grain direction of each piece of wood and locate the template such that there is no short grain through the slender curves of the lower leg, where breaking might occur.

Photo 1- Start the mortises in the legs by boring holes with a drill press or dowel jig.
Bore holes to start the mortises in the legs for the rails and stretchers as in photo 1. Bore two 1/2″ holes at the top of each leg, directly adjacent to each other at 1″ deep. Locate the upper end of the holes at 1″ from the end of the leg. Thus when the horn is removed the mortise will be 1\2″ from the leg top. Bore 3/8″ holes, 1/2″ deep for the stretcher rail mortises. Again make the holes adjacent, and locate their mutual center at 10″ above the leg bottom.
 Photo 2- Scribe the rectangular sides of the mortises around the bored holes. Circular holes find rectangular mortises very boring.
Use a dowel jig to bore the holes, or use a simple drill press setup as in photo 1. Note the spacer between the leg blank and the clamped stop block in the photo. Locate the clamped block to position the hole furthest from the part end, then insert the spacer, whose thickness is equal to the distance required between hole centers. This is the quickest setup to use to ensure that all four mortises are similarly located.
 Photo 3- Begin chiseling the mortises by making angled cuts from the scribed lines. This establishes the perimeter of the mortise, giving you an easy reference edge to work to as you complete the mortise.
Use a square to mark out the top and bottom of each mortise as in photo 2. Sharpen your chisels, and first use them to establish the rectangular opening at the top of the mortise. Place the chisel on the marked line at the mortise top or bottom as in photo 3. Angle the chisel toward the center of the mortise for these initial cuts. Make similar cuts along the sides as in photo 4, aligning the cuts with the two edges of the holes as shown. Next make directly vertical cuts with your chisels as in photo 5, working your way inside out toward the rectangular opening you made previously. Use the walls of the bored holes as references to be sure that your cuts are vertical. Do not cut beyond the walls of these holes. Leave the mortises slightly small for now, and make them larger as needed later when you have the tenons at hand to fit the two together well.
Photo 4- Establishing the sides of the mortise.
 Photo 5- Once the mortise perimeter is established, make vertical cuts to clear out the mortise, working toward the perimeter.
Next band saw out the legs as in photo 6. Note that in this step you cut only the front and back face of the leg with the band saw, not the sides. You’ll taper the sides later with drawknife and spokeshave. Use the band sawn legs to scribe the shape of the upper legs onto knee blocks, cut these out and glue them onto the legs as in photo 7. Match the figure, color and grain direction of the knee block pieces as closely to the legs as possible. Be sure they are clamped tight so the glue line is as small as possible.

Photo 6- Scribe the leg shape on the leg sides and cut out on the band saw.

Photo 7- Gluing the knee blocks to the leg tops.
Once the knee blocks are out of clamps, scribe the taper onto them using a template made from drawing 3. Before band sawing these cuts, tape the waste pieces from behind the upper legs back in place as in photo 8 to provide support for the leg during the cut. Cut the tapers as in photo 9.

Photo 8- Before cutting the taper on the knee blocks, tape the waste onto the back of the legs so that the leg is supported on the band saw table during the cut.

Photo 9- Cutting the knee block tapers.
SPOKESHAVES
The tools you’ll use to shape the legs are shown in photo 10. They are: a drawknife, for roughing out the form; two spokeshaves, one with a flat sole and the other with a curved sole; and a scraper, for final smoothing.

Photo 10- Left- drawknife. Top- flat sole spokeshave. Right- curve sole spokeshave. Center- scraper.
You’ll find flat and curved spokeshaves, drawknives and scrapers at Woodcraft.
The difference between any spokeshave and a drawknife is that the spokeshaves have soles which regulate the depth of cut. A drawknife removes much material fast because it can remove large shavings, but it is hard to control for careful detailing. Because the spokeshave removes less with each pass, you can carefully remove high spots and fair them into the overall shape. The spokeshave sole guides the tool along the contours of the work. To avoid chatter during the cut, it is important to apply downward pressure on the tool as you use it to keep the sole firmly on the wood surface.
A flat sole spokeshave is generally easier to control because the flat sole is easier to keep firmly on the work. However, the flat sole prevents the tool from cutting internal curves, such as the splat foot on these legs and the curve behind the knee at the top. This is where the curve sole is needed (photo 11). The flat sole will cut internal curves with large radii however, like the front lower section of the leg above the foot.

Photo 11- Shaving the top of the splat foot with the curve sole spokeshave.
Whether you are using a drawknife, spokeshave, or scraper, always follow the grain direction. Failure to do so will result in tearout. If the tearout is severe enough, smoothing it out will visibly alter the contour of the curve.
SHAPING THE LEGS
Do the shaping in two main stages. First, flatten all sides in the horizontal direction so that the legs are rectangular in cross section everywhere. This is how the legs come out of the band saw, so you are just smoothing the sides. The second part of this first main stage is to fair in the curves vertically with both drawknife and spokeshaves. Only then, after the sides are smooth and the curves fair, do the second main stage which is to round over the corners. The reason for this succession of stages is partly because many of the corners will remain sharp (with only slight roundovers) to begin with, but also it is easiest to check for smooth, flowing shapes on a side by sighting down a sharp corner (or arris, as it is called). Use these arrises as references to judge how smooth and uniform the curves are in the vertical direction.
Begin with the curve sole spokeshave on the splat foot (photo 11). Hold the leg in a bar clamp lengthwise which in turn is held in a bench vise. Unfortunately this cut, being at nearly 90o to the grain, is an endgrain cut and is by far the most difficult cut to make with the spokeshaves. If you’ve never used a spokeshave before, experiment with scrap first to see how the tool works and to encourage yourself that indeed the tool does work well when not on endgrain. As I said before, the blade must be sharp, and new blades need sharpening (see sidebar on sharpening). Adjust the tool for a minimal depth of cut with the adjusting knobs. Note in photo 11 the position of the thumbs on the tool, which helps apply pressure where it’s needed. You must apply a great deal of pressure when cutting hardwood endgrain such as this. Start the cut on the edges where you will cut less, and work your way into the middle. Don’t worry about a bit of chattering, that can be cleaned up later with a scraper. Use the curve sole spokeshave to clean up the top rear of each leg too.

Photo 12- Smoothing the legs with the flat sole spokeshave.
 Photo 13– Sighting the curves and marking high spots.
Use the flat sole spokeshave to smooth the rest of the front and back surfaces on each leg (photo 12). This is not the final smoothing, but just serves to eliminate the rough band sawn surfaces so you can see the shape of the curves for the next step, which is shaping the curves with the drawknife. Sight down the line of the corners, as in photo 13, looking for high spots. Mark these roughly with a pencil. Use a drawknife at about a 45o angle to bring the corner down to your pencil mark as in photo 14. Then remove the high spots with the drawknife lying flat on the side as in photo 15, and cut down to the line you made with the drawknife at an angle. ALWAYS be careful to follow grain direction with a drawknife.

Photo 14– First use the drawknife on the corners at an angle to cut to your drawn lines. This gives you an easy reference point to look to as you then shape each leg side.
 Photo 15- Pull off the high spots on the leg sides, cutting only to the lines you made in the last step.
Mark the front and rear faces of the leg at the area of the stretcher mortise to make the width of the leg at this point become about 1-1/8″ (photo 16). Again use the drawknife at an angle to cut down to this point, and then fair that line into the line of the upper leg (photo 17). Don’t bring this line all the way down to the foot yet. With the lines established clear out the waste with the drawknife on the sides and smooth with the flat sole spokeshave.

Photo 16- Mark the leg widths on the backs in the area of the stretcher mortise.

Photo 17- Taper the leg sides from the knee block to the area of the mortise, but not to the foot yet.

Photo 18– Marking out the front of the foot.
 Photo 19- Marking out the back of the foot.
Mark out the foot by sketching in the shape of the front as in photo 18. Then mark the rear of the foot to match the width of the leg in the area of the stretcher mortise (photo 19). Again use the drawknife to bring the lines of the corners close to the drawn lines (photo 20). You’ll need the curve sole spokeshave to do so on the front of the foot (photo 21). Then clear out the waste, this time using the curve sole spokeshave alone, as in photo 22. The sole of the shave is curved front to rear, but is straight side to side, and so is perfect to shape around the cylindrical form of the foot as it tapers into the leg.

Photo 20- Roughing out the back of the foot with the drawknife, making the initial angled cut to the drawn lines.

Photo 21- Using the curve sole spokeshave on the foot front to make the initial angled cut to the drawn lines.
 Photo 22- Shaping the foot sides to the angled cuts with the curve sole spokeshave.
The next step is to smooth all the curves on the four faces with the flat and curved sole spokeshaves, until you achieve smooth, flowing lines. Leave the corners sharp so you can easily see the shape of the curve on each surface. All of this shaping will take a “fair” amount of time (pardon the pun), and you should not rush it. Your eye can handle only so much looking at and comparing of shapes before you get tired. Once you reach a certain point, sleep on it, come back tomorrow and check again with a fresh perspective.
When you are satisfied that the lines are all smooth and flowing, round over the front edges of the legs with the spokeshaves. The greatest amount of rounding should be in the area opposite the stretcher mortises on the leg fronts, and taper the rounding in both directions, down to nothing just above the foot and just beyond the intersection of the knee blocks and main leg. Begin this rounding with the spokeshave set for a heavy cut, then finish up with it set on a light cut to make an even surface. Whether or not you round over the back edges is up to you, but note that the stretchers must have flat surfaces for the tenon shoulders to contact.

Photo 23- Scraping the legs smooth.

Photo 24– Final shaping and smoothing of the rounded leg corners.
Once you have smoothed and rounded to your satisfaction with the spokeshaves, use a scraper to smooth out the facets left by the spokeshave knives (photos 23 + 24). The scraper is your last shaping tool, and though it takes off very little at a time it will remove enough to make a depression if you cut too much in one spot. You will probably have a few spots where you weren’t able to always follow the grain correctly with the spokeshaves, like the glue line of the knee blocks, where the grain direction may run opposite on either side of the glue line. Thus there will be some tearout, and the scraper is just the thing to clean it up. Use the scraper to give a slight roundover to the sharp edges left on the legs.
TOP

Photo 25– Cutting kerfs at the table saw to start the resaw process for the top pieces.
 Photo 26- Complete the cut on the band saw.
For a nice table like this, bookmatching the top pieces adds a special touch. Resaw 2x pieces to get your bookmatched set. This will go easier if you first cut kerfs in the edges of the pieces on the table saw as in photo 25, using a thin kerf blade preferably. Then cut through the remaining wood in the middle with a band saw as in photo 26. The resulting pieces need to be planed and edge jointed, then glued up as in photo 27. If you don’t have a jointer, carefully do the edge jointing on the table saw with a good quality carbide blade, or with a hand jointer plane.

Photo 27- Gluing up the top pieces.
Use the string and nails method to scribe the oval top (photo 28). On the under side of the top, locate two nails 22 inches apart and equidistant from the center. (Don’t drive the nails right in your glue line.) Make a loop of string 28 inches long when doubled, and use it as shown to scribe the oval line. Cut out the shape on the band saw, or with a sabre saw.
 Photo 28- The string and nail method for marking an ellipse. Pull the loop tight with the pencil and scribe around the entire perimeter.
Use scrap pieces from around the edges of the cut to double the edge of the top (photo 29). Make these pieces 1-1/2″ wide. Glue the pieces onto the underside of the top directly adjacent to where they were cut off, so that the color matches and so that the grain direction of the edge piece matches that of the table edge. Otherwise you could have a cross-grain situation that would cause problems later. Once out of clamps smooth the edge with spokeshaves or a stationary sander, and roundover the edges to your liking.

Photo 29- Gluing the edge pieces in place.
STRETCHERS
 Photo 30- Boring holes in the center post blank for mortises.
Cut the stretcher center post out of 2x stock, with angles as shown in the drawings. The piece starts as a parallelogram in section. Lay out and bore holes for mortises just as you did for the legs (photo 30). These mortises should be centered along the final width of the faces, which is different from the center of the faces after the angles are cut on the table saw (see drawing). Next mount the piece in the lathe and turn a pretty design to your liking. Be sure to leave an adequate area on the faces for the stretcher shoulders to contact. Because I used highly figured wood for the post, I chose to wet sand it on the lathe to 600 grit to bring out the figure (photo 31). If you don’t have a lathe make the piece 3 inches long and round over all edges with about a 1/8″ radius.
 Photo 31- Turn the center post to a nice shape. Make sure you leave adequate flat areas around the mortises for the stretcher shoulders.
Cut out four pieces at 3/4 x 3-1/4 x 13 for the stretchers. Cut the tenon faces on the ends of these pieces at the table saw with a dado set as in photo 32. The tenons that enter the center post are parallel to the center line of the stretcher, and are easily cut with the dado set at 90o as shown, using the miter gauge for support and the rip fence to adjust the tenon length of 1/2″.
 Photo 32- Dado setup for square tenons on stretchers where they join the center post.
The tenons that enter the legs are at a 15o angle to the centers of the stretchers, as discussed above. These can be cut with the dado too, using a slightly different setup as in photo 33. Attach an extension fence onto the miter gauge, and clamp a stop block onto this fence as shown to refer the cut off the opposite end of the piece. Alternate sides of the tenon must be cut on alternate sides of the blade, so make the extension fence long enough to locate the stop block on both sides. Be sure to line up both angled shoulders so that they are on the same plane.

Photo 33- Dado setup for angled tenons on stretchers where they join the legs.
Adjust the thickness of the tenons so that they are just slightly wider than the mortises. Cut out the side faces of the tenons for the top rails using a similar setup.
 Photo 34- Use a handsaw to cut the tenons on the stretchers.
Now trace the shape of the stretchers onto the pieces (drawing 4), cut them out, and shape as you did with the legs, but this time rounding over all arrises. Then cut the upper and lower faces of the tenons using a handsaw and chisels as in photos 34 + 35. Now carefully fit each tenon to its corresponding mortise by increasing the mortise or reducing the tenon, whichever seems best to you. Take off small amounts during this process to gradually bring the pieces to a snug fit. If you remove too much, you can glue pieces onto the tenons to make up the difference (an old furniture repairer’s trick), but try to avoid that by proceeding slowly in the first place.

Photo 35- Clean up the tenons and shoulders with a sharp chisel. Pare the tenons down to fit the mortises well.
RAILS
The four rails that join at the leg tops point toward the inside of the table top at odd angles. Their centers are at 90o to the back faces of the legs (unlike the stretchers). On a table this size, there is no need to join the rails themselves together. Secure each rail to the underside of the top with three screws per rail. Carefully bore the holes and countersinks in the rails for these screws so that the screws won’t come through the top.
Note that the rail is offset from the leg in height because the leg contacts the edging on the top, whereas the rail contacts in the middle.
But don’t screw the rails on just yet. The exact location of the legs on the underside of the top must be a function of the alignment of the stretchers. When you glue up the stretcher assembly you must carefully align all parts so that the tenon shoulders butt properly against the respective surfaces of the legs and the center post. Make this fit your highest priority, and let the exact location of the legs on the top fall where it may in the wake of properly fitting stretcher joints. You won’t notice a leg that’s 1/4″ to the left of where it’s “supposed” to be, but you will notice gaps at the stretcher joints.
ASSEMBLY PROCEDURE
After fitting all tenons, bore screw holes and countersinks in the top rails, but not yet in the underside of the top. Dry fit the top rails to the legs. Put the top, bottom side up, on your bench. Glue all the stretcher tenons and mortises, and assemble on the underside of the top. Use a band clamp as in photo 36 to pull in the joints. The band clamp will tend to pull the legs that are closest to each other toward each other moreso than toward their opposing counterparts. I wrapped fishing line around legs that needed to be brought closer to each other. I found that 8 lb. test line had good elasticity which neatly pulled the legs closer. Use whatever clamps, fishing line, etc., that are necessary to pull individual legs this way or that until all the joints are tight. Note the stick set between the center post and table top. The action of the clamps may tend to pull the post toward the top; the stick prevents this.
Confirm that the leg tops are close to where they ought to be on the underside of the table, and that they are parallel and square to the table top. If you have done all your stretcher joinery carefully, the stretcher joints should line up and the legs should be parallel and close to their locations.
 Photo 36- Pulling it all together is the fun part.
Let the stretchers dry. Then, glue the top rail joints, and locate the leg tops where you want them, and bore through the screw holes in the rails onto the underside of the top for the screws. Now sink the screws through the rails into the top. Put another band clamp onto the legs, as close to the leg tops as possible without it sliding, and tighten to bring the glued rail joints together.
Lastly install screws through the back of the legs into the edge pieces of the top as in photo 37. These will help stabilize the table.

Photo 37- Set screws into the top through the legs for added stability.
FINISHING
A scraper leaves a smooth surface, but you may find that along some areas it will chatter and leave a less than perfect surface. Wet sand with 220 grit paper to remove these imperfections, and then follow that up wet sanding with 320 grit. Don’t bother with 400 and 600 grit unless your wood is highly figured, because fine polishing of ordinary lumber doesn’t usually make much visual difference, whereas polishing figured lumber is like polishing a gemstone.
For this California black walnut I chose orange shellac for the finish partly because the orange hue compliments the red of the wood. But shellac is not the best finish for a table top because it does not resist water and alcohol which will eventually land on the table. Polyurethane varnish, though impervious to water and alcohol, just seems inappropriate for such a traditional table. High quality tung oil varnish is probably the best bet if you don’t want to treat the table with the caution required with a shellac finish.


0 Comments