


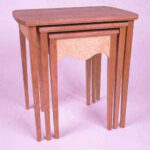
 Wooden Nesting Tables |
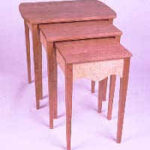 Wooden Nesting Tables |
REQUIREMENTS FOR THIS PROJECT-
I made the tables as they are shown using a table saw, router, scroll saw, drill press, jointer and biscuit joiner. The jointer is only a convenient way to taper the legs, the alternative is the simple table saw taper jig shown in a photo. You can use a dowel jig instead of a biscuit joiner, or cut mortise and tenon joints if you like. The scroll saw (or band or saber saw) and drill press are only for the curves. Make all the edges straight and you don’t need these tools. The router is used only for edge details and veneering, these can be eliminated too, if you like. So, you can make these tables with only a table saw, hand drill and dowel jig if you choose. I used cherry and bird’s eye maple veneer for the tables shown.
NOW WHAT DO YOU DO when all the relatives show up, plunck themselves down in the living room, and start putting their drinks down anywhere in sight? Sometimes you want to tell them to bring their own tables and chairs, not to mention their own drinks. This set of nesting tables will go a long way to alleviate the first part of the problem, the rest is up to you.
These nesting tables Woodworking projects are relatively simple to make, requiring a minimum of tools. If you choose, you can add a beautiful touch by veneering the rails of the tables, as I did, though it isn’t necessary. Veneering may seem like a very difficult process, but there are degrees of difficulty in veneering as with other woodworking skills. The veneer work here is some of the simplest and is a good way to cut your teeth with thin wood (so to speak!).
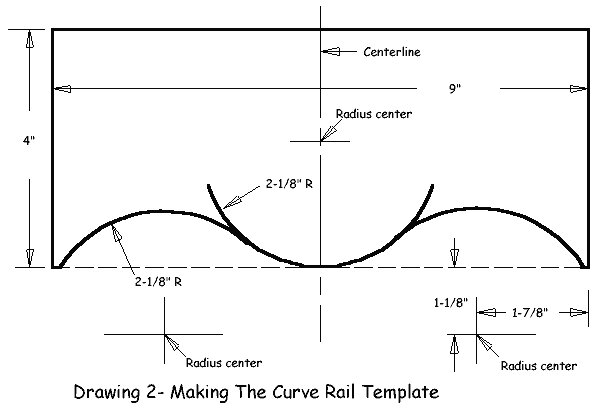
Drawing 2- Making The Curve Rail Template. Use this diagram to draw your own template for front rail. Use a similar procedure for other rails if you choose to make them curved too. First draw the rectangular rail with the 4 x 9 inch dimensions. Then put a center line through it as shown. Next locate the center point of the middle arc at 2-1/8 inches above the bottom line and along the center line. With a compass, strike this middle arc as shown. Finally, locate the radius centers of the other two arcs as shown and strike them with the compass. A second way to do this procedure is to replace your compass with a tin can or any other round object with approximately the same radius. First use this cylinder to mark the center arc, then locate it appropriately for the other arcs and scribe them.
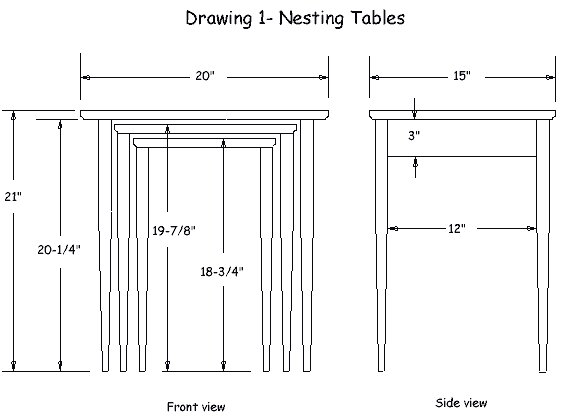
Cut Out List, Nesting Tables
4- 1 x 1 x 18 legs
4- 1 x 1 x 19-1/8 legs
4- 1 x 1 x 20-1/4 legs
All the above can be gotten by gluing together
3- 3/4 x 3-1/2 x 41 blank for legs
Remaining parts:
1- 3/4 x 4 x 9 front rail bot table
1- 3/4 x 3 x 15 rear rail top table
1- 3/4 x 3 x 12 rear rail mid table
1- 3/4 x 3 x 9 rear rail bot table
2- 3/4 x 3 x 12 side rails top table
2- 3/4 x 3 x 11 side rails mid table
2- 3/4 x 3 x 10 side rails bot table
1- 3/4 x 14-3/4 x 20 top, top table
1- 3/4 x 13-1/2 x 14-1/2 top, mid table
1- 3/4 x 12-1/2 x 11-1/2 top, bot table
Let’s Start Building Wooden Nesting Tables

Click here to download woodworking plans
Photo 1- Edge glue your stock to get the widths involved. If you use biscuits or dowels to align the edge joints, be sure you locate them where they won’t be exposed after you cut up the piece. Put thin rippings between the clamps and the wood so the clamp doesn’t dent the wood. Clean the wet glue off with hot water and a rag. It’s harder to clean off after it’s hard.
You will need following woodworking tools:
Clamps
Biscuit Cutters
Glue
Begin with two glue ups to get the necessary dimensions for tops and legs. Edge glue stock to make a single wide piece at least 15 x 48″ from which the three tops can be cut (photo 1). The thickness and width of the legs is 1″, which you could easily get from stock thicker than the common 3/4″, but if you don’t have thicker stock you can get all the legs by gluing up a blank from three pieces of 3/4″ stock (photo 2). This means that each leg will have a glue line in it, but if your stock color is consistent these will not be readily visible, and such a glue up is a more efficient use of stock than cutting 1″ thick legs out of 1-3/4″ stock.
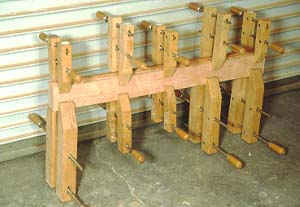 Photo 2- This is the glue blank for the legs. Cleaning the wet glue off this is less important because you can remove dried clumps with the table saw. But, these clumps against the table saw fence make the first cut a pain, so at least smear the wet glue flat if you don’t bother to clean it all off. Use a lot of clamps with light pressure rather than a few with a lot of pressure. The number of clamps shown is a minimum for such a glue up.
Let the glue up for the legs dry overnight, even if you use yellow glue which, in most situations, can be taken out of clamps after an hour. Here, however, if the boards you glue up are not straight, the stress of the boards trying to straighten out may be enough to break a one hour bond. When out of clamps rip the blank into 6 pieces at approx. 1-1/16″ square, cut into 12 legs, and bring to 1″ square.
 Photo 3- Make this simple taper jig to cut the tapers in all the legs. Be very careful with such a jig. Use a push stick to hold down the leg during the final part of the cut. Don’t hold your fingers on the leg during the final part of the cut.
Tapering the legs can be done with one of three methods. the simplest, though most tiring, is with a hand plane. Secondly, make a tapering jig as in photo 3 for the table saw. The jig is three pieces of plywood- a base, a side fence, and a rear fence. Position the side fence on the base at an angle equal to the angle of the taper, and place a rear fence behind the leg to keep it from being pushed backward.
Don’t get out your protractor to figure the angle of the taper. Remember “rise and run” from your algebra? Think of the angle as producing a line that “runs” a certain distance to the side over a “rise” of a certain distance. In other words, for every 12 inches of rise along the taper, it runs 1\4″ to the side. Use this figure for all the legs, and begin each taper 12″ above the bottom of each leg. To set the angle of the side fence on the taper jig, position it so that it is out of parallel 1\4″ over 12″ of length.
First cut the taper into one side of a leg, then flip it 180o to taper the opposite side. Notice that now the freshly cut side faces the fence and does not contact it along the taper, only along the untapered area. Make a tapered wedge to fit between the fence and the freshly tapered edge.
Run the jig against the rip fence on the saw. Note that the position of the fence determines the exact location of the taper along the leg. Note also that you must move the fence farther from the blade for longer legs because, being longer and at an angle, the end of the leg will be closer to the blade than that of shorter leg.
Click here to download woodworking plans
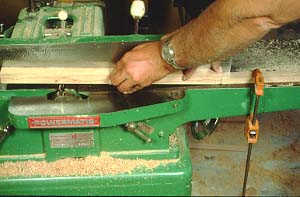
Photo 4- If you have a jointer, tapering the legs is real easy. But- keep your fingers away from the cutter head! Don’t pass your fingers over the cutter head as the cut is made, and always keep your eye on the cut as it is made so you know where you fingers are. See text for proper procedure.
The object is to remove 1\4″ of width (and thickness) off all four edges of the bottom of the legs, and have the taper end 12″ above the bottom. A third way to do this is on a jointer, as in photos 4 and 5. Set the jointer fence 1-1/8″ from the front end of the knives (so minimal knife area is exposed), and clamp a stop block to the jointer in feed table 10 inches behind the throat. Set depth of cut at 1/16″. Butt one end of a leg against the stop, and lower the front down onto the revolving cutters and out feed table as in photo 5. Whenever using a jointer, always keep your fingers either behind the cutter head or in front, never pass your hand over the cutter head. Push the leg forward, move your left hand around the cutter head to the out feed table, push the leg through with the left hand and remove your right from the leg.
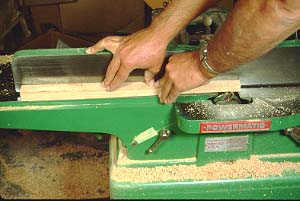 Photo 5- Finishing the taper cut. Having alternately passed your hands over the cutter head by lifting them above and away from the cutter head, both hands are on the work again during the final portion of the cut.
The effect of this cut is to take a 1/16″ taper off that edge of the leg. Do this twice more for a total of 3/16″, and then do all other sides similarly. Once all legs are done, remove the stop block and run all sides again, without lowering them onto the cutter, but starting well ahead of the cutter as usual. Take about 1/32″ off on this pass. This cut removes the small divot that is formed at the top of the bevel when the leg is lowered onto the cutter head.
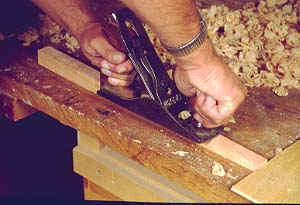 Photo 6- Use a hand plane to make th tapers, or to clean them up after making them on the table saw or jointer. A sharp hand plane is a joy to use, a dull one is worthless. Clamp scraps to your bench as shown to hold the work in place as it is planned.
Whether you cut the tapers on the table saw or the jointer, when through a good way to clean off saw or knife marks is with a smoothing plane as in photo 6. Or, sand them with a belt sander, use a scraper, or, as a last resort, hand sand (yech!)
Get out your rails, rip to width and cut to length. If you choose to veneer them with some beautiful wood, such as the bird’s eye maple I used here, now is the time. But- why veneer at all, when you could just use figured lumber to make the rails to begin with? Because it will cost you an arm and a leg, that’s why. Veneer, though not cheap, costs less by surface area (if not by board foot).
Click here to download woodworking plans
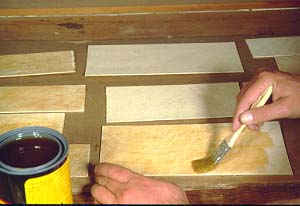
Photo 7- Paint the surfaces to be bonded with contact cement with a throw-away brush. Carefully inspect the areas covered to see if the cement has absorbed completely, or if a thin layer remains behind. If it is completely absorbed, apply more. There must be a thin layer of cement on both bonding surfaces for it to work well.
Use contact cement to glue the veneer to your rail stock. Though not as strong as woodworker‘s glue, it is easy to use and more than adequately strong to hold veneer to wood. Cut out pieces of veneer that are larger than the rails to which they will be glued. Apply contact cement to both the rails and veneer pieces (photo 7) and then let it dry before you press the two together. Why? Because that’s how the stuff works, don’t ask me why. It bonds best from about 10 minutes after application to within a few hours thereafter. Read the label instructions carefully, and use only in an area that has cross ventilation, that is, two doors or windows open with a breeze going through, or out on the back porch.
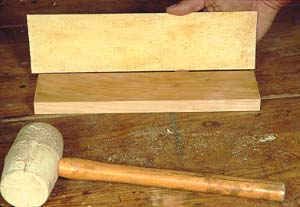 Photo 8- Once the cement has dried, place the veneer pieces on the rails and firmly bang down on all areas with a rubber hammer, or roll over it with a wallpaper roller. Make the veneer pieces larger than the rails, at least 1/4 inch wider all the way around, so it will be easy to locate them on the rails.
It is possible that your wood will absorb too much of the first coat of contact cement, so it is best to apply two coats if there is any question. When dry carefully position and apply the veneer. Locate it correctly the first time because once the cement grabs it is there permanently. They don’t call it contact cement for nothing. Bang it down with a rubber mallet (photo 8).
Trim the excess veneer off the rails with a flush trim bit in the router table as in photo 9.
 Photo 9- Use a flush trim bit on your router table to flush trim the veneer to the rail edges. Keep your fingers a fair distance from the bit at all times, because the router could grab the work and throw it, pulling your fingers in, especially in a climb cut. See text.
To prevent tearing out the veneer, climb the cut, or feed the veneer into the cutter in the direction of rotation. While doing so, press down firmly on the rail so that the bit does not grab the wood and throw it. Because you are cutting through such thin wood this is easy to control, whereas in other situations climbing the cut with a router is risky at best.
Click here to download woodworking plans
Photo 10- Here a scroll saw is being used to cut the curve on the front rail, but a band saw will do the job too. A scroll saw has a finer toothed blade however, leaving a finer surface that needs less or no finish sanding.
The flush trim bit you use will get gunked up with contact cement, so you might want to buy one of the cheaper ones used for trimming counter top laminates.
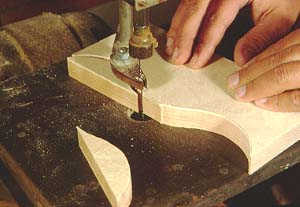
Trace the pattern onto the curved front rail, and cut it out with a band, scroll, or coping saw (photo 10). Note that this is the only rail with a curved edge as originally designed, but if you wish you can make all the rails with curved edges too. In this case you may want to increase the widths of those parts. You will also need to adapt the curve template design to suit the varying lengths of rails. Smooth the rough edge with a drum sander mounted in the drill press (photo 11), or by hand.
 Photo 11- A drum sander in a drill press in a very convenient way to smooth out the curved surfaces. Note that the work rides on a plywood table clamped to the drill press table. This is so the drum bottom can reach below the work, ensuring that the sander hits the entire thickness of the stock.
Cut a 1/4″ x 1/4″ dado along the top inside edge of all the rails, at 1/2″ from the top edge (photo 12). This provides a convenient plane for drilling holes for screws that hold the rails to the tops.

Photo 12- You can use a dado cutter on your table saw to cut the hole drilling plane, or just use your combination blade, taking two passes to end up with a dado 1/4 inch wide.
Use biscuit joints to attach the legs to the rails. Carefully mark out the legs so you know exactly where to cut slots- and where not to. Orient the legs so that the glue line is on the side of the front legs (so it is not seen from the front) and on the front of the rear legs (so it is not seen from the side).
Click here to download woodworking plans
Photo 13- Biscuit joinery has the advantage of being very fast, and is certainly plenty strong for these tables. Once you are set up as shown it goes fast. But if you don’t have a biscuit joiner, you can join the legs with dowels using a dowel jig. Two 1/4 or 3/8 inch dowels in each rail end are sufficient.
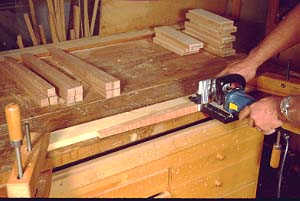
To cut the slots on the legs, clamp a fence to your bench as in photo 13 to hold the leg securely as you cut. Offset the slots on the rails so that the face of the rails is 1/8″ behind the face of the legs.
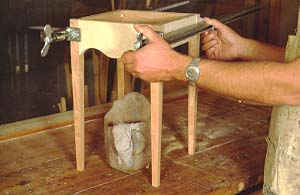 Photo 14- Use very gentle pressure when you glue these up. The biscuit or dowel joints do not depend on clamp pressure to achieve their strength, so all you need to do is squeeze the parts together until they touch. Put clamp blocks between the clamps and wood to avoid dents and to avoid rust stains when the water from cleaning the glue hits the iron clamps. Clean the glue carefully with hot water.
Glue up the rails and legs in two steps. First glue the rear rails and front rail to their corresponding legs. Let these dry, then take them out of clamps and glue the side rails and front legs to these assemblies (photo 14). Doing the glue up in two stages this way reduces the number of clamps on the legs at any given time and avoids congestion. Check that the rails are square in relation to each other at the second stage.
 Photo 15- Cut a cove detail into the bottom edge of all the table tops. If your cove bit has a bearing you don’t need the fence, but I usually put one there anyway for safety and because it helps guide the work along.
Cut the tops to size, and trace the curved shape onto the edges of the uppermost top. Cut these curves out with a band, scroll, or coping saw and smooth by sanding. Set up a cove bit on the router table with a fence as in photo 15, and cut a cove into the bottom corners on the sides and fronts of all tops; not on the backs. Note that this cove cannot be more than 1/4″ wide, because on the two inner tables it is close to or adjacent to the plane of the table legs.
Click here to download woodworking plans
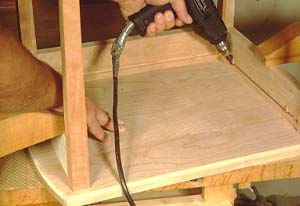
Photo 16- Use a tapered bit with countersink to drill holes for the screws. You don’t need the countersink here, but it cuts away some of the wood above the dado to make it easier to get the screw in place.
Attach the table tops to the legs with screws located in the special groove cut inside the rails. Turn a top over, and clamp its rail assembly in place as in photo 16. Drill for screws as shown, but don’t cinch the screws down yet.
Whenever you attach a table top to its rails, you have to make provision for the fact that the top will shrink and expand across the grain with moisture variations in the air. If you don’t, when the top moves (and it will), it will break any glue bond resisting its movement, or break screws. Or, if the glue or screws hold, the top itself will split. One way or another, you have to let the top move or it will wreak revenge in a most unpleasant way.
 Photo 17- Now you do need the countersink. Use it to expand the top 1/4″ of the hole in the rail to give the screw room to move as the table top changes dimension with changes in humidity.
With these table tops, the amount of movement will be minimal because the width of the tops is never greater than 15″. Since you don’t need to expect them to move a lot, you can make lesser provision for their movement. Remove the rail assembly from the top after drilling screw holes as above, and bore countersinks in the rail tops over the screw shank holes as in photo 17. Bore these about 1/4″ deep. Put the rail assembly back on the table top and screw it down. The countersunk shank holes will allow the table top to drag the screw shank back and forth a bit as it moves, without pushing against the body of the rail.
Figured veneer will benefit from fine sanding down to 600 grit paper, to bring out the way swirling grain plays with light. A durable finish on top, such as polyurethane varnish, is advisable if these tables will be used for any purpose that may get them wet, such as potted plants or Uncle Fred’s unending supply of frosty aluminum cans.
A good book on finishing is Bob Flexner’s Understanding Wood Finishing.


0 Comments